How to Set Tabs – Word (Microsoft 365)
How to Set Tabs – Word (Microsoft 365)
Summary
Step by step instructions for setting tabs in Word 2013
Overview
Tabs allow you to position text exactly where you would like it. To avoid problems with text alignment, use tabs rather than spaces. The default tab settings for Microsoft Word are every half-inch. If you do not like the Word settings, you can set your own tabs.
Tab Types
Tabs come in different types which are defined by the way text aligns with the tab. The following table explains the different tab types.
Tab Type
|
Windows Icon
|
Purpose
|
Left (Normal)
|
 |
With the Left tab, text will begin at the tab position and continue to the right of the tab.
|
Right
|
 |
With the Right tab, text will end at the tab and flow to the left.
|
Center
|
 |
The Center tab works similar to centering a line of text but instead of centering between margins, text is centered at the tab location.
|
Decimal
|
 |
The Decimal tab is used to align numbers and text with a period. This is useful for a group of numbers or a list of instructions.
|
Bar
|
 |
The Bar tab is used to add a vertical line at that position. This could be used when you want to set off some text.
|
Setting a tab does not automatically align your text. You still have to press [Tab] at the appropriate places.
There are two ways to work with tabs: from the Ruler or from the Tabs Dialog box.
Working with Tabs from the Ruler
Working with tabs using the Ruler option is a quick and easy way to set and adjust tabs. The Ruler options allow you to set, move, delete, or change tabs. You can display the ruler by clicking the View Ribbon, and checking the Ruler option in the Show group.

Setting Tabs
- Select the paragraph(s) that will receive new tab settings

- Click the TAB TYPE icon until the desired tab type is selected
- On the Ruler, click the lower edge of the ruler where you want the tab
Moving Tabs
- On the Ruler, click and hold the tab you want to move
- Drag the tab to the new location and release the mouse button
Deleting Tabs
- Click and hold the tab you want to delete
- Drag the tab into the document area of the screen and release the mouse button
Changing Tab Type
To change the tab type, you can either delete the tab and add a new tab of the correct type or you can use the Tabs dialog box.
Working with Tabs from the Tabs Dialog Box
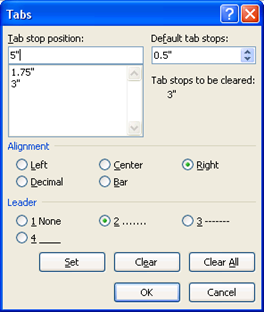
The Tabs dialog box allows you to adjust the placement and type of tab. Although the Ruler option is a quicker way to adjust tabs, the dialog box allows you to use leaders and enter specific tab locations.
In the Tabs dialog box, you can set leaders for the tabs. Leaders are lines (solid, dashed, or dotted) that appear in the blank space created by a tab. The most common use for a leader is in a table of contents where a dotted line leads up to the page number. Leaders guide the reader's eye across the page.
To access the Tabs dialog box
- Select the paragraph(s) that will receive new tab settings
- From the Home tab, in the Paragraph group, click PARAGRAPH
The Paragraph dialog box opens.
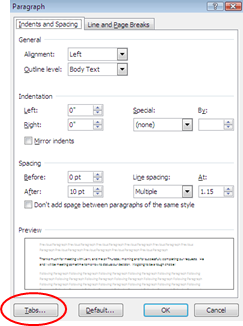
- Click TABS...
The Tabs dialog box opens.
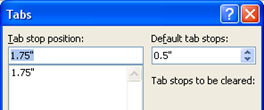
Setting Tabs
- Access the Tabs dialog box
- In the Tab stop position text box, type the desired value (in inches)
- Adjust the tab alignment and leader if necessary
- Click SET
- To set additional tabs, repeat steps 2-4
- >After all tabs have been set, click OK
Deleting Tabs
- Place the insertion point within the paragraph with the tab settings you want to delete
- Access the Tabs dialog box
- From the Tab stop position scroll box, select the tab to be deleted
- Click CLEAR
HINT: To delete all tabs, click CLEAR ALL
- To delete other tabs, repeat steps 3-4
- Click OK
Moving Tabs or Changing Tab Type
Moving tabs or changing the tab type in the Tabs dialog box involves adding a new tab and deleting the old one.
- Access the Tabs dialog box
- In the Tab stop position scroll box, select the desired tab
- Click CLEAR
- In the Tab stop position text box, type the new tab location
- Adjust the tab alignment and leader if necessary
- Click SET
- Click OK
Key Words: tabs, indents, indentations
Article ID: 463
Created: May 27, 2015
Last Updated: October 2, 2020
Online URL: https://info.abtech.edu/article.php?id=463