Images - Intermediate Word

Summary
Information about using images and different image file types
Basic Insert Using Word – Step by Step
- Insert : Insert tab >> Illustrations group >> Pictures
Choose an image from file location
- Anchor : the point where the image is attached in Document
Use text with image – choose wrap then anchor will appear
- Wrap Text : Select from the Layout Options dialog box
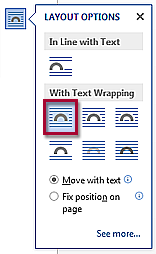
- Moving the image: Click on image >> click and drag to move the image anywhere on the page
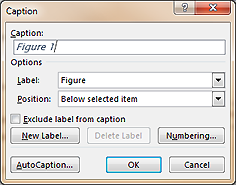
- Caption : Right Click on image >> Insert Caption
- Aspect Ratio : Click on the image >> use any corner “handle” to resize
Resizing at the corners keeps the scale in ratio (no distortion)
Image Edit Menu
- Right-click on selected image to see this menu.
- Style : Picture Quick Style – shapes, borders, border colors
- Crop : Narrowing focus of image
- Cut/Copy/Paste : Remove/Repeat/Re-place
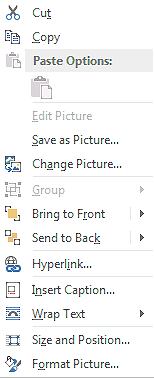
- Change Picture : Replaces one image for another
- Bring to Front/Send to Back : Changes layer order
- Hyperlink : Create an image hyperlink
- Insert Caption : Label an image
- Wrap Text : Flow text around image
- Size and Position : Scales image, sets location on the page
- Format Picture : Applies styling, correction, cropping…
Snipping Tool for Windows
- Launch : Start Button >> All Programs >> Accessories >> Snipping Tool
- Select a Snip type from the menu or click on New button
- Drag the cursor around the area you want to Snip
Selecting the item places the snip on the clipboard and on the Snip Window
- Save Snip to use later or send via email
- Save with the save floppy disc icon and name as you wish
- Send via email: File >> Send To >> Email recipient
Screen Capture within Word Program
- Insert >> Illustrations group >> Screenshot >> Screen Clipping
- Define the area to capture by tracing the area to be selected
- As you let go of the mouse the captured area appears in Word
Note: The item that is being captured needs to be directly below the Word document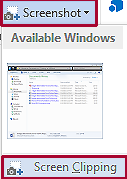
Digital Image File Types
JPG, TIFF, PNG, BMP. What are they, and how do you choose? These and many other file types are used to encode digital images. The choices are simpler than you might think.
Part of the reason for the plethora of file types is the need for compression . Image files can be quite large, and larger file types mean more disk usage and slower downloads. Compression is a term used to describe ways of cutting the size of the file. Compression schemes can by lossy or lossless .
Another reason for the many file types is that images differ in the number of colors they contain. If an image has few colors, a file type can be designed to exploit this as a way of reducing file size.*
- BMP – Bitmap
- Large File size - Lossless
- Native to Microsoft’s operating systems
- Not used in professional settings or the web
- JPG or Jpeg – Joint Photographic Experts Group
- Compressed images – works well on the web
- Is the format of choice for nearly all photographs on the Web
- 16million colors
- Lossy – image compression reduces image quality but greatly reduces file size
- Nearly every digital camera can save images in JPG format
- PNG – Portable Network Graphics
- Lossy or lossless image compression
- Used in place of patented GIF format
- 256, or greater, colors
- Most used image compression format on the web
- Allows for transparency
- TIFF or TIF – Tagged Image File Format
- Popular among graphic artists
- Generated with most scanned images
- Best quality from a digital camera
- OCR capable
* users.wfu.edu/matthews/misc/graphics/formats/formats.html
Questions about this article? Please contact the HelpDesk at (828) 398-7550 or email at helpdesk@abtech.edu
Article ID: 464
Created: June 1, 2015
Last Updated: March 26, 2021
Online URL: https://info.abtech.edu/article.php?id=464


