Waitlist Procedures
Summary
Overview of the waitlist procedures and how to register for a waitlisted course
Overview
When a class section is full, some sections offer the opportunity to be added to a waitlist at the instructor's discretion. This means that when an enrolled student drops a section, the open seat is made available to the first person in the waitlist queue. If you're selected from the waitlist, you'll receive an email in your student account letting you know you can register for the course. You'll have about 24 hours to log in to Self-Service and register for the course before the next student in the waitlist queue is notified.
If you add yourself to a waitlist, check your student email frequently so you do not miss the registration window.
The College also uses this information to decide whether to add another section of this class. If enough students end up on the waitlist and another classroom and instructor are available, the department may add another section.
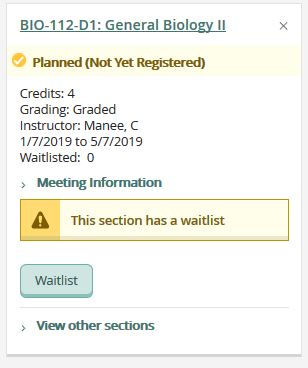
Adding Yourself to a Waitlist
Instructions for registering for classes through Self-Service can be found through the link below.
Class Registration Instructions
When you get to Step #7 at the tutorial linked above, click on the "Waitlist" button under the section you want to waitlist (instead of the "Register" button).
Note: the "Register Now" button that registers you for all open courses that you have Scheduled will not add you to the waitlist. You will need to select the "Waitlist" button under the individual section information to the left of the screen.
Registering for a Waitlisted Course
When you receive the email notification saying that a spot has opened for you, log in to your Self-Service account. After logging in, click on "Registration," and then click "Schedule and Register for Classes." Your waitlisted course will appear down the left of the screen with the option to register for the section (you may need to scroll down).